Deep Compositing: When to Reach for It, and How to Keep It From Killing Your Machine

Deep Compositing is one of those techniques that feels like complete, over-complicated overkill—until you are handed a monster of a shot and realize it’s the only solution that can actually save your life.
The catch is that deep data is incredibly "expensive." File sizes balloon like crazy, processing speeds drop to a crawl, and if you aren't careful, you will end up waiting for Nuke to spin its wheels forever 555.
If you carry that heavy overhead through your entire node tree without optimizing, you might just find your machine throwing a tantrum and crashing when you least expect it.
As someone who has crashed Nuke with deep data more times than I care to admit, I wanted to share a simple guide on when to actually pull this skill out of your toolbox, and how to keep it organized so your machine doesn't cry for mercy.
What is Deep Data, Really? (No Jargon Allowed)
A standard 2D image stores one single set of color and alpha values per pixel. A deep image, on the other hand, stores multiple data samples at various layers within a single pixel—with each sample representing a different depth distance.
Think of it this way: for any given pixel, a deep image knows that at 40 meters there is a patch of volumetric fog, behind it at 200 meters sits a building, and at infinity lies the sky. This allows us to slot other elements in between those layers with mathematically correct transparency and lighting.
The real-world lifesaver here is Volumetric Holdouts. When you have CG fog that needs to realistically wrap around a live-action set element, or particle renders intersecting with various geometry layers, Deep Compositing gives you a flawless result instantly without needing to manually paint or roto matte edges until your eyes bleed.
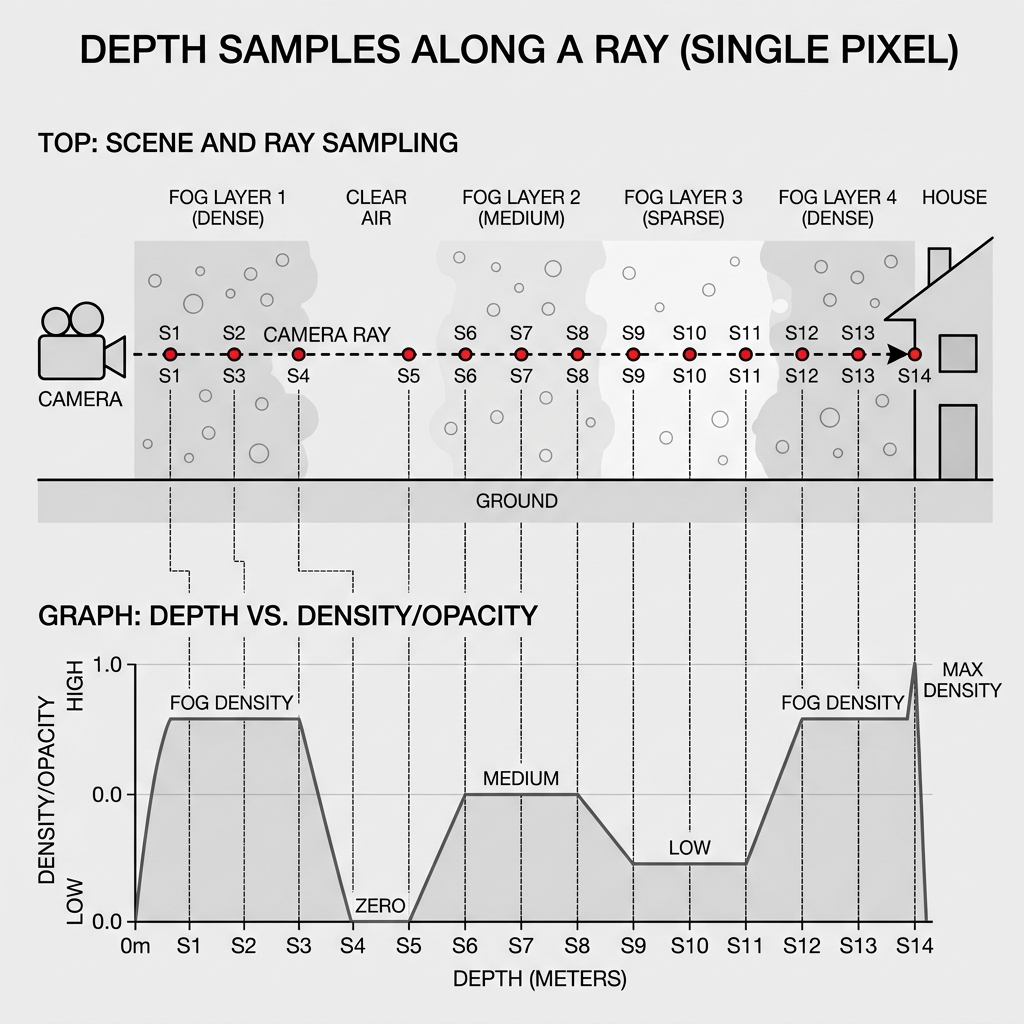
FIG_01: Schematic technical diagram illustrating Deep Data structure — showing how rays passing through fog analyze and record multiple depth/transparency samples in a single pixel for mathematically precise compositing.
The Optimization Rules That Actually Matter
1. Flatten back to 2D as early as possible (The Golden Rule) Deep data should only live in your node tree for the exact duration of the depth-aware composite. The very second you have merged your deep volumes and completed your holdouts, use a DeepToImage node to flatten it back to regular 2D! Carrying that deep overhead further downstream is pure waste.
2. Use DeepCrop Religiously Always limit your processing area with a DeepCrop node to restrict the bounding box to where depth interaction is actually happening. If your volumetric fog is only sitting on the left side of the screen, there is absolutely no reason to calculate deep data for the entire frame. This single habit can cut your render times in half.
3. Merge only what actually needs depth-awareness Deep Merge operations are computationally expensive and scale poorly. If an element doesn't need to blend based on scene depth against other elements, keep it as a flat 2D layer and merge it in after you’ve flattened the main deep stack.
4. Keep an eye on your Sample Counts Heavy volumetric renders can easily generate thousands of dense samples per pixel. In Nuke, check the sample histogram in your Deep node properties. If you see massive peaks over broad areas, head over to the Lighting department and ask if they can optimize and reduce the samples—almost always, they can lower it without any visible loss in final quality.
When to Skip it Entirely
Deep Compositing is awesome, but it’s definitely not a tool for every scenario. Standard greenscreen extractions, multi-pass CG comps without volumetric atmospheric layers, or shots where elements are clearly separated by distinct distances—all of these are processed faster, lighter, and simpler as flat 2D comps.
The simplest filter is to ask yourself: "Does this shot have elements that genuinely need to know about each other's physical depth?" If the answer is no, skip it! Save your system's VRAM and energy for the shots that actually demand it.
The Bottom Line
When used with a clear plan, a deep workflow is a magical tool that saves huge amounts of roto and matte-generation time. But when used carelessly, it will grind your workstation to a halt.
Being a pro is knowing exactly when to go deep... and when to flatten it back and get on with the comp!