The 8 Essential VFX Compositing Techniques You Can't Live Without

Hey everyone! Today, I want to talk about the core pillars of our craft—the fundamental techniques that make or break a shot.
So many times, when we bring a 3D asset, a matte painting, or a stock element into a plate, it just feels like it's "floating." It doesn't sit in the environment. Why? Because believable compositing isn't just about combining images; it's about honoring the physics of cameras, light, lenses, and math to trick the human brain.
To help you on your journey, I’ve put together a master checklist of 8 Essential VFX Compositing Techniques. Whether you're a junior artist starting out or a seasoned compositor polishing your game, keeping these rules close to your heart is how you deliver shot after shot with absolute production quality.
1. Tracking: The Foundation of Motion
Before you even touch a tracker, here's a golden production tip: if the camera motion is incredibly erratic, try stabilizing the plate first in your comp script before you start adding elements.
Still, Tracking is where every compositing journey begins. In our pipeline, we generally break tracking down into three distinct methods based on what the camera is doing:
- 2D Tracking: Perfect when the camera is moving around but there is zero parallax. Think of a single operator standing in one spot, panning or tilting on a tripod.
- 2.5D Tracking: Your best friend for monitor burn-ins, screen replacements, or flat surface extensions. We typically reach for corner pins or planar trackers (like Mocha) to solve these flat surface transformations.
- 3D Tracking (Matchmove): The absolute solution when the camera is moving through space, creating physical parallax. This recovers the original lens and camera path in 3D space.
Pro-tip for Motion Blur: To make your tracked element feel completely integrated, you must match the motion blur of the plate. This means finding out the exact camera shutter angle/shutter speed used during production to calculate the perfect blur length.
FIG_01b: Analyzing camera movement with high-density 2D and 3D tracking markers to reconstruct a reliable 3D workspace.
2. Levels & Color Balancing: Fighting the "Float"
This is where the magic of blending happens. If your levels don't match the environment, the human eye will spot the fake immediately. We call this Color Balancing, and there are three major components you must align:
- Luminance: Aligns your black and white points. You never want to composite a 3D asset with dark gray shadows into a background plate that has deep, rich, crushed blacks. Luminance is all about matching the overall contrast ratio.
- Color Tone: The art of matching the RGB channels individually. You need to align your red, green, and blue values across three ranges: Darks (Shadows), Mids (Midtones), and Highlights. If your asset has a strange green cast in the midtones, it's not going to sit well in a warm, sunset scene.
- Saturation: The overall color intensity. A dull, low-saturation element will stick out like a sore thumb in a vibrant, highly saturated environment. Keep an eye out for spot saturation—where specific areas of the plate are more saturated than others.
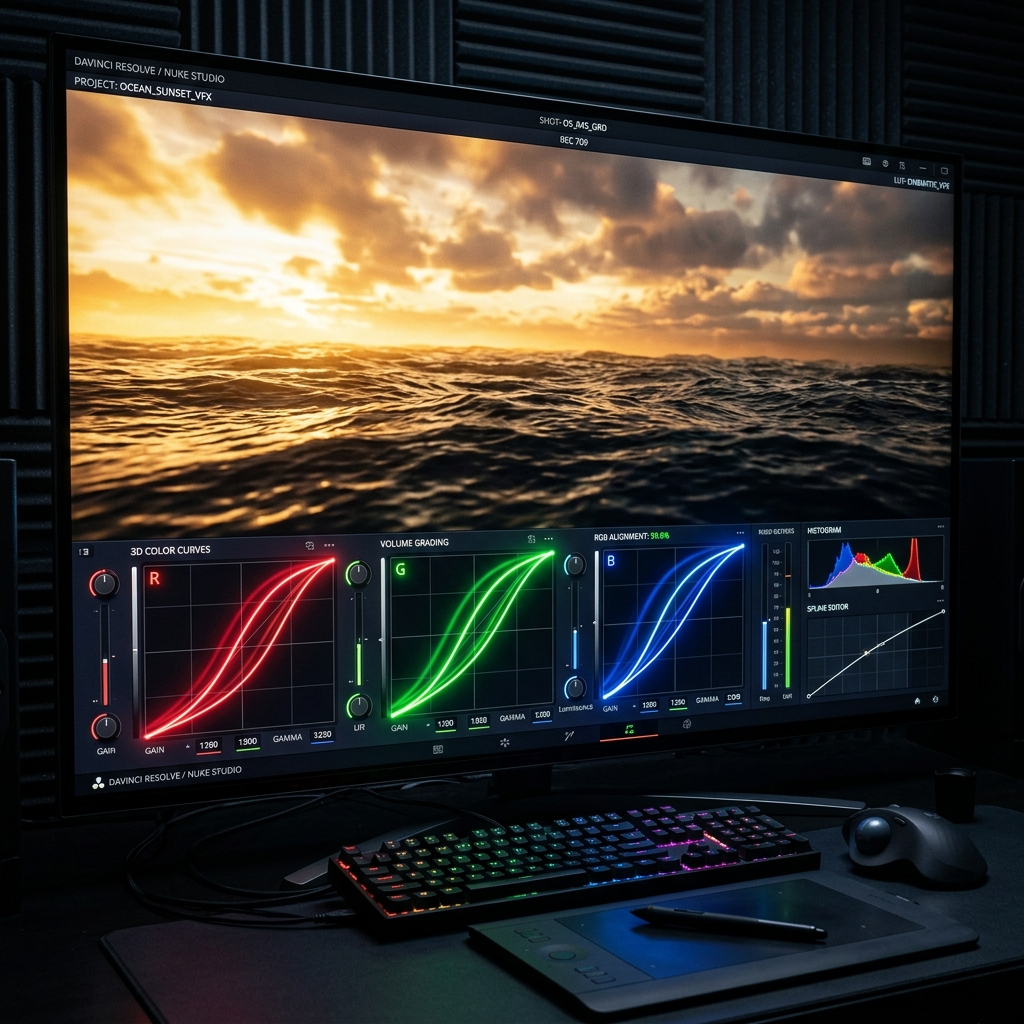
FIG_02: Matching RGB color curves across darks, mids, and highlights to eliminate environmental mismatches.
3. Grain: The Invisible Glue of Film
Every single camera sensor, from modern digital cinema cameras to vintage 35mm film stock, leaves its own distinct footprint: grain or digital noise.
If your CG assets are perfectly clean, they will never look real. You must analyze the plate's grain structure and replicate it on top of your final comp. Here are the 5 characteristics to match grain perfectly:
- Intensity: The overall volume and density of the grain.
- Luminance Curves: Digital sensors typically have heavy noise in the darks/shadows and specifically in the blue channel, while the highlights are incredibly clean. Make sure your grain follows this curve!
- Size: The physical scale of the grain kernels.
- Sharpness & Softness: Whether the grain particles are crisp and sharp, or slightly diffused around the edges.
- Irregularity & Shape: The unique, chaotic noise pattern characteristic of that specific camera model.
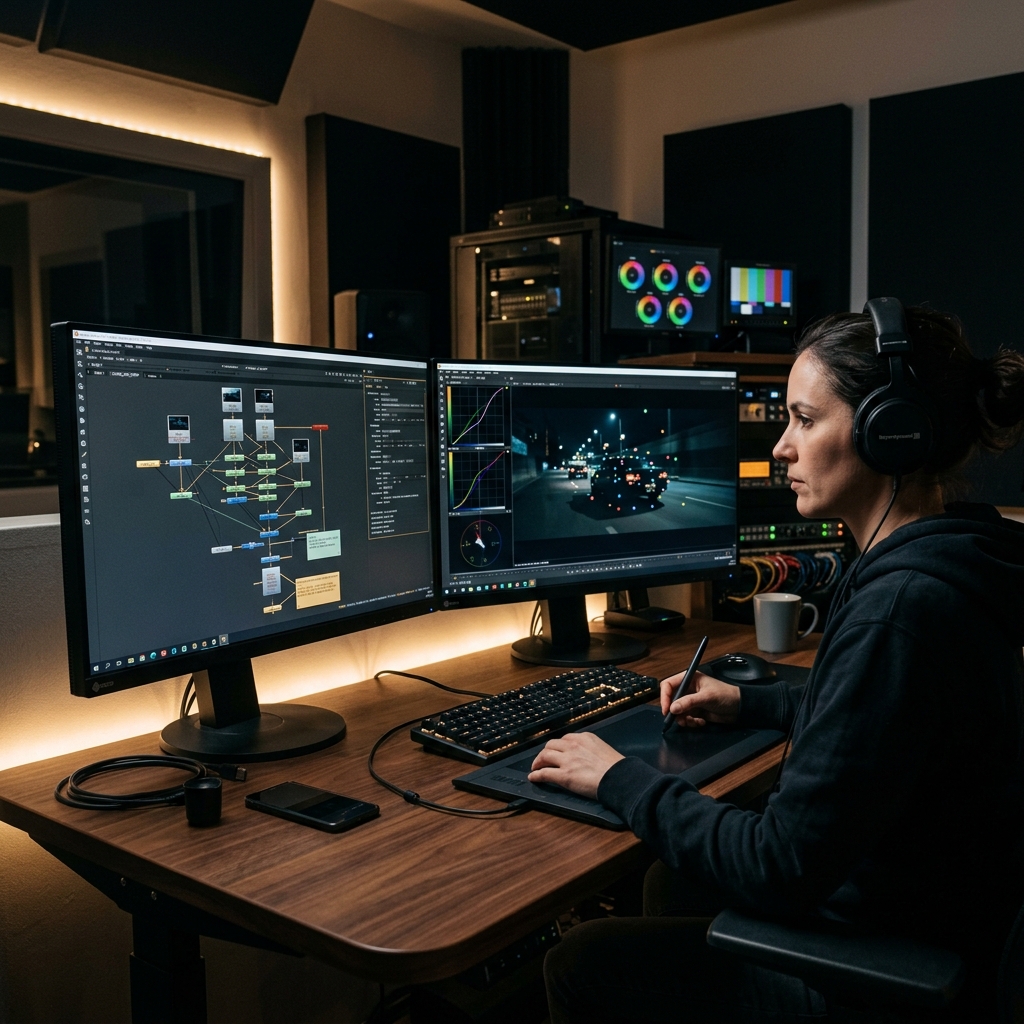
FIG_01: Meticulously matching grain structures and edge colors across a 3D lens workspace is what transforms disconnected elements into a single, cohesive frame.
4. Edge Detail: The Make-or-Break Test
The edges are the ultimate giveaway of a bad key or a lazy comp. If you've ever used automated, single-click keying tools, you know they tend to eat away fine details or leave ugly, fuzzy borders.
To master edge integration, always break your workflow into three steps:
- Step 1: Extract the edges so they retain all the fine, micro-detail (hair, fur, motion blur) of the original plate.
- Step 2: Modify the edge color (Color Spill) to match the lighting environment of the new background.
- Step 3: Modify the edge softness and positioning dynamically to sit naturally in the new atmospheric space.
5. Focus & Bokeh: Respecting Lens Physics
Real camera lenses have a physical depth of field. Some elements in a frame will be razor-sharp, while others will be beautifully out of focus. When matching focus, always analyze two things:
- Focus Amount: The sharpness or softness of your asset based on its depth position in the shot. Macro shots have a shallow depth of field (blurry backgrounds), whereas wide establishing shots have a deep depth of field where almost everything is sharp.
- Bokeh Shape: The shape of the out-of-focus highlights. Some lenses blur background lights into soft donuts, others into sharp heptagons or octagons. This shape is directly determined by the physical shape of the camera iris blades. Matching the bokeh shape is how you make your comp look like it was shot through the exact same glass.

FIG_03: Replicating physical camera iris shape and depth-of-field focus falloff to ground CG assets.
6. Lens FX: Embracing Beautiful Imperfections
Real glass is imperfect. It’s these subtle artifacts and optical flaws that give a scene its cinematic character. When compositing, keep these key lens effects in your toolkit:
- Chromatic Aberration: An optical dispersion where different wavelengths of light focus at different positions. This shows up as color fringing on high-contrast edges (usually green/red or purple fringing). Older lenses exhibit this way more than modern, high-end prime lenses.
- Lens Distortion: Lenses warp lines near the edges of the frame based on their focal length (barrel or pincushion distortion). We shoot lens grids to analyze this curvature, and we also watch out for Lens Breathing—the slight change in focal length that occurs when the camera pulls focus.
- Glows: A great way to blend highlights, but easy to abuse. I always live by "The Glowden Rule" in my scripts: “When you think your glow intensity looks absolutely perfect... cut it in half! Now your glow is actually correct for the shot.” 555 Trust me, less is always more.
- Lens Flares: Flares can add immense scale and drama, but they must be grounded in physical reality. Never just drop a preset flare into a scene without the matching ambient light wrap and correct lighting vectors to back it up.
- Light Wrap: The physical spill of light bleeding from a bright background over the edges of a foreground subject. Getting the temperature and intensity of your light wrap correct is crucial to making the foreground element sit in front of a bright light source.
- Lens Grime & Vignette: Dust, oil, and smudges on the lens glass, combined with the natural darkening towards the corners of the frame (Vignetting). These are excellent storytelling tools to guide the viewer’s eye to the center of the action.

FIG_04: Replicating lens imperfections like organic chromatic aberration fringing and light bleed wrap.
7. Perspective: Respecting the Horizon
No matter how beautiful your color grading is, if the perspective is wrong, the shot is ruined. You simply cannot warp an asset shot from a high angle to fit a low-angle plate. You must align these two crucial characteristics:
- Lens Compression: How compressed the background appears in relation to the foreground. This is determined by the lens focal length and camera distance.
- Horizon Line & Vanishing Point: The horizontal plane where the sky meets the earth, and the lines of perspective converge. Your CG asset's horizon must match the plate's horizon exactly.
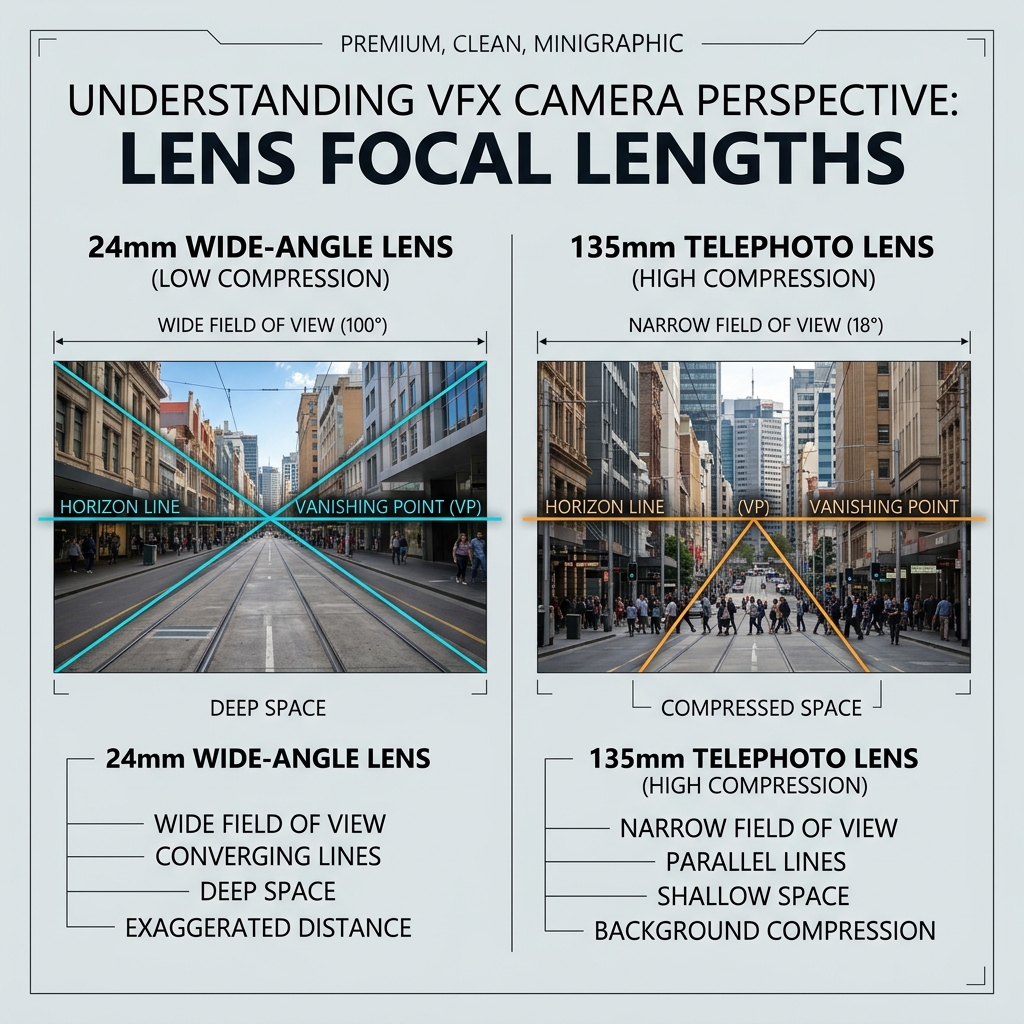
FIG_03b: Analyzing how lens focal lengths compress background elements relative to the foreground, which is crucial for matching vanishing points.
8. Lighting: The Ultimate Integration
Our final technique is the lifeblood of integration: matching the lighting environment. Your asset must look like it exists in the exact same light space, honoring these three components:
- Light Direction: The angle of the primary light source. Shadows cast by your asset must align with the shadows already present in the plate.
- Light Quality: The hardness or softness of the light source. Is it a harsh, direct sun casting sharp shadow lines, or an overcast sky producing soft, diffused contact shadows?
- Light Intensity: The exposure value of the light source. The highlights, midtones, and shadows on your asset must match the exposure levels of the rest of the scene.
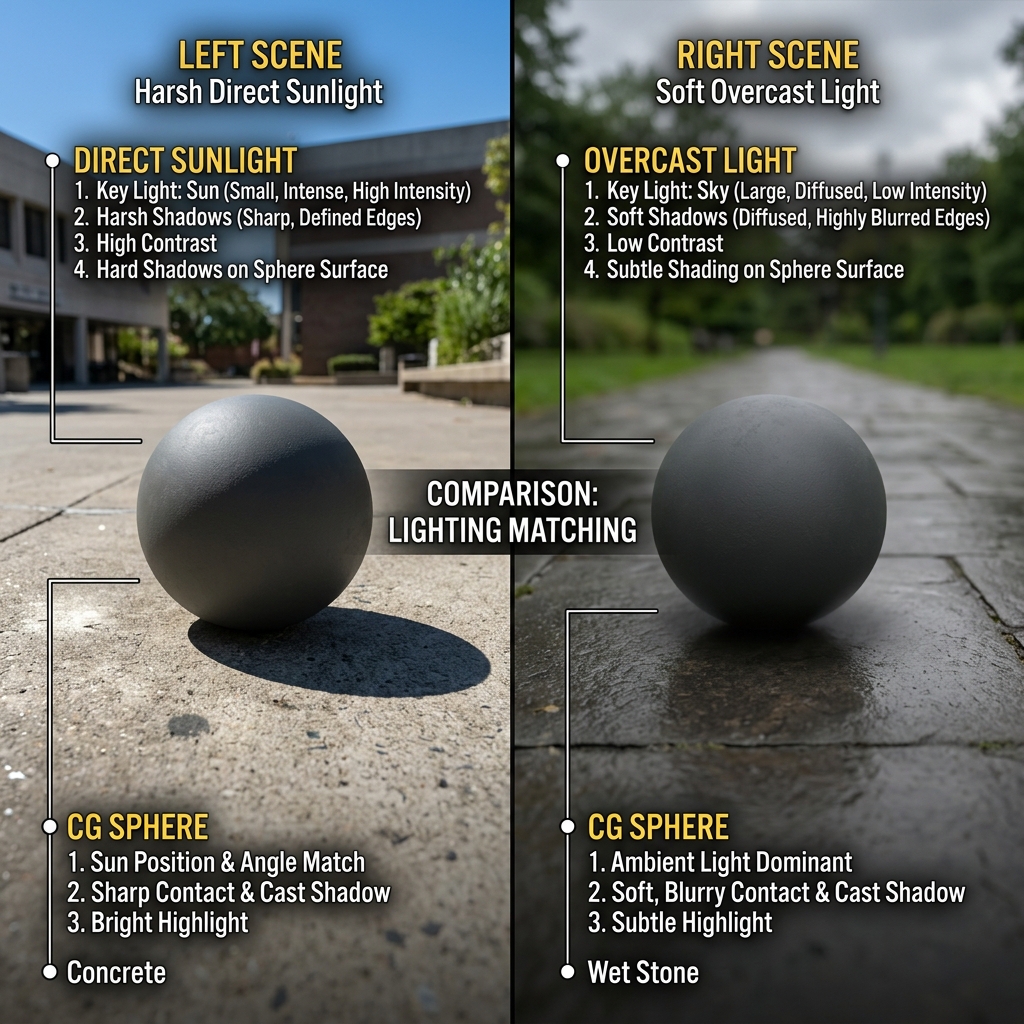
FIG_04b: A visual breakdown matching lighting quality—comparing hard direct light casting sharp shadow edges vs. soft diffused overcast light casting smooth contact shadows.
And there you have it—the 8 Essential VFX Compositing Techniques! Train your eyes to study real-world camera behavior, analyze optical physics, and keep practicing. Once you master these pillars, your comps will jump to a whole new level of realism. Have fun compositing, and let's keep making beautiful pictures! 555